When a small child appears, a lot of additional items appear in the house with him, which you did not have before. This is also about metal cans from baby food. Men have long appreciated these strong and durable containers and use them for their needs: for screws, nails and various repair items. Isn't it time to adapt them in the kitchen too? After all, they are well suited for storing bulk products. Now these jars are covered with convenient soft plastic lids and therefore will be quite convenient to use. But with them you need to work a little, so that they acquire an elegant look. You will see, you will no longer put the jars of cereals away into the closet, but just the opposite: put them in plain sight and tell everyone how you did it so beautifully. And I suggest you do metal cans of baby food.
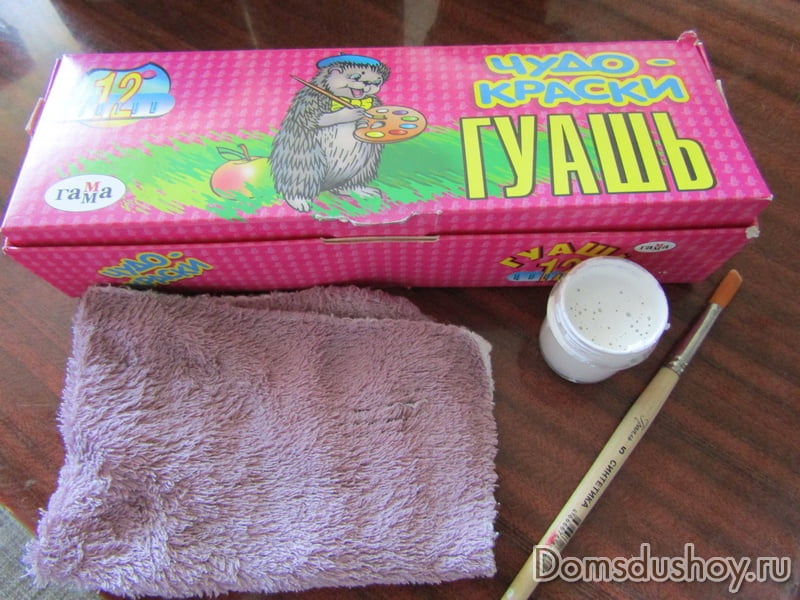
I will say right away that I am not a decoupage master and did it on metal cans for the first time. I am not going to teach anyone, but I just want to tell you how I managed to cope with this task. I had six cans of baby food, five types of regular two- and three-layer napkins, and the desire to put it all together.
For work I used:
- an old table that is not a pity to drip with glue or paint
- cans 6 pieces
- three-layer napkins with a floral pattern
- PVA glue
- plastic cup for diluting glue
- scissors
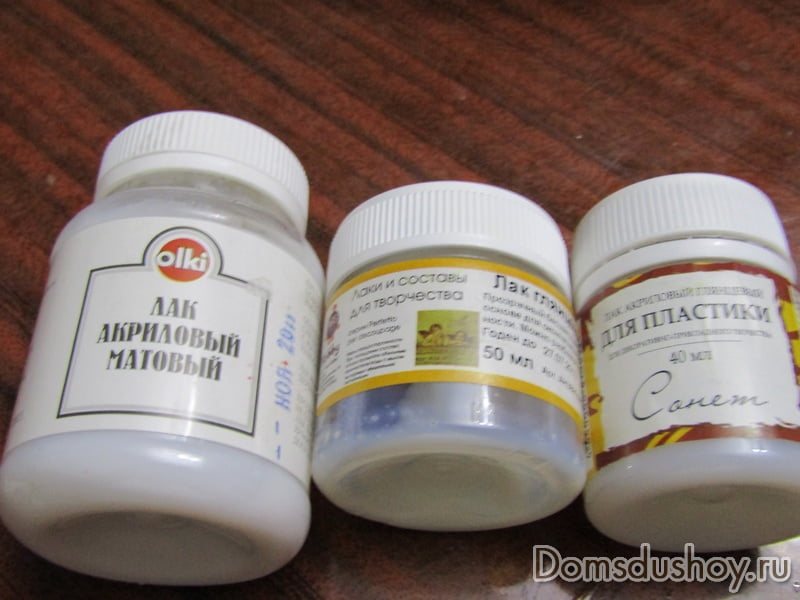
- white gouache
- brush
- acrylic varnish (glossy)
- soft microfiber cloth (for timely removal of dirt)

By the way, for decoupage it is better to choose dense and even harsh napkins. They lie better on the surface and do not tear under the brush.

- I prepared jars: washed them inside and out. I read on the Internet that someone uses a regular hair dryer to speed up drying. My jars dried naturally. If there is a paper label on the jar, it must be washed off and the remaining glue removed with a cotton pad soaked in nail polish remover or acetone. If the labels are sticky, they must be completely removed from the surface of the jar. My jars have letters and symbols printed directly on the metal by the manufacturer, so I didn’t have to wash anything. And I removed the sticky stickers from the lids.

- In order for what is drawn on the bank not to shine through a thin layer of a napkin, it is necessary prime. Usually acrylic primer or paint is used. I didn't have either. I decided to use plain white gouache. Diluted it with water not too liquid.
- Started painting cans with gouache. But I took a rather thin brush, it would be possible to take a normal one, which is used to paint windows, for example.
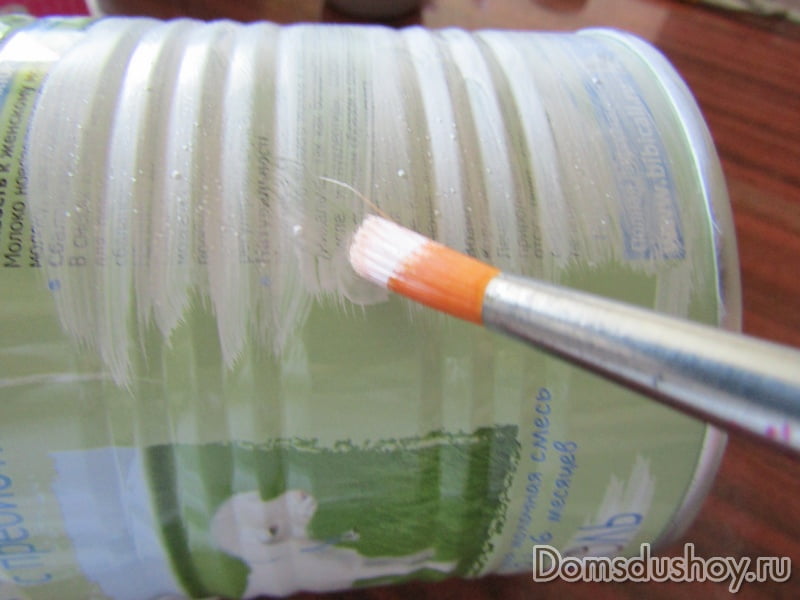
Gouache fits well on the metal, it is almost impossible to see through it what was painted on the cans. I covered the jars in one layer. But the second coat would hardly be needed, as there is a concern that the paint may peel off due to the fact that there will be a thick layer.
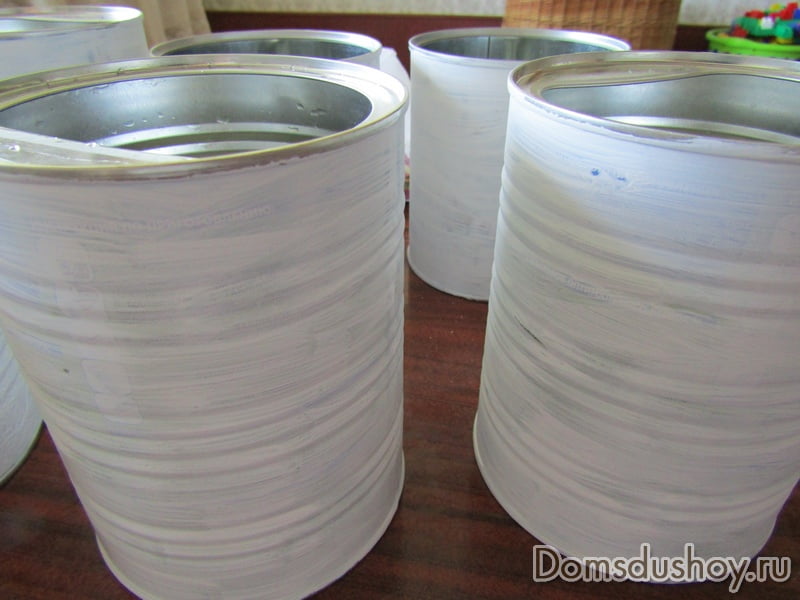
Pretty quickly I painted all the cans and put them to dry again.

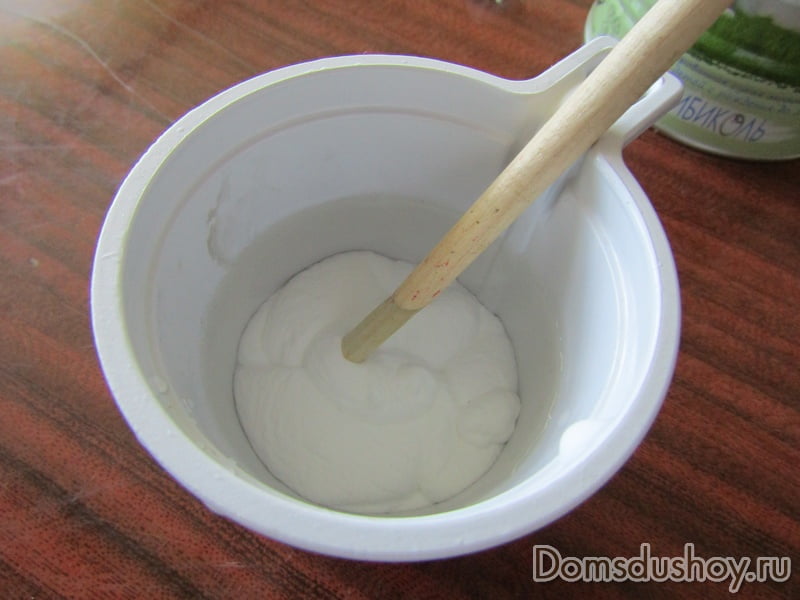
- While the banks were drying, I diluted PVA glue with water in a glass, about one to one. Mix well and leave for a few minutes for the glue to combine with the water.
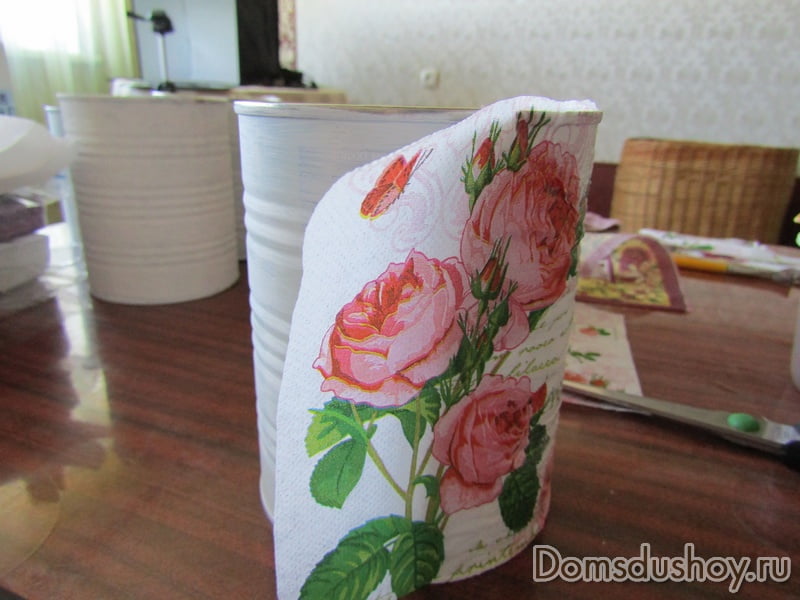
- In the meantime took up napkins. I separated the top paint layer from the bottom white ones. I used napkins with a size of 33 * 33 cm. And the length of the napkin turned out to be just such as to completely wrap the jar.
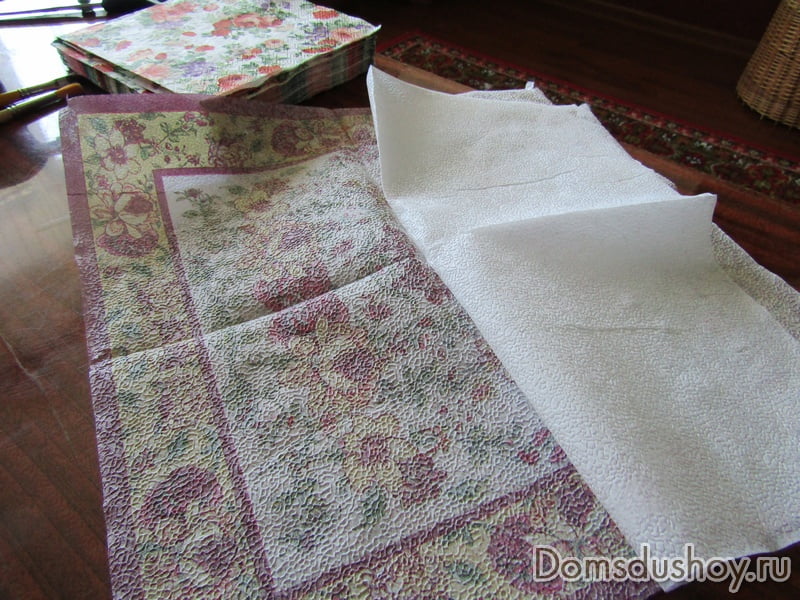
Without using scissors, I separated several fragments from the napkin.

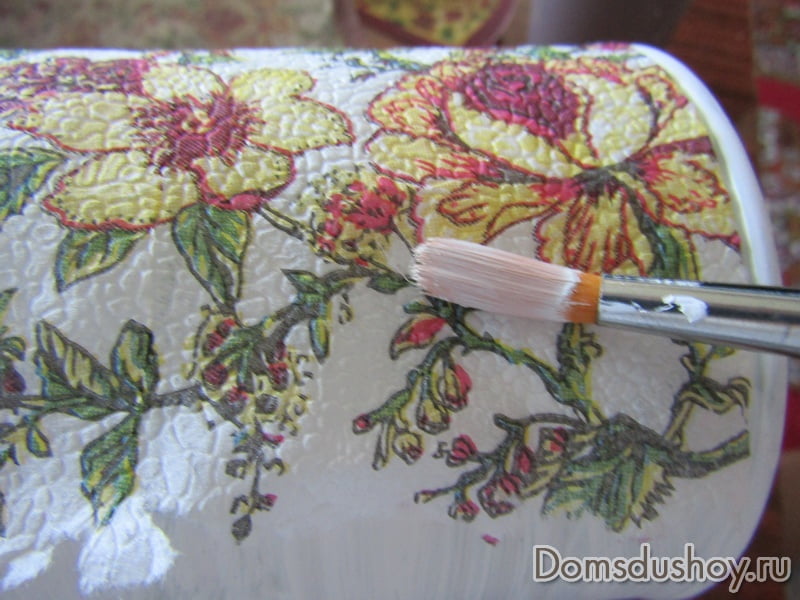
- And finally, the banks dried up and I started gluing the top layer of the napkin to the surface. I first washed the brush from gouache, and then dipped it in glue and carefully smeared the napkin. Some rules should be followed: attach the napkin to the jar as evenly as possible and start smearing glue on its edge, gradually moving on. You can not do this too quickly, sweepingly, in a hurry. Otherwise, the napkin will stretch, wrinkle, and by the end of the work it may not even lie flat.
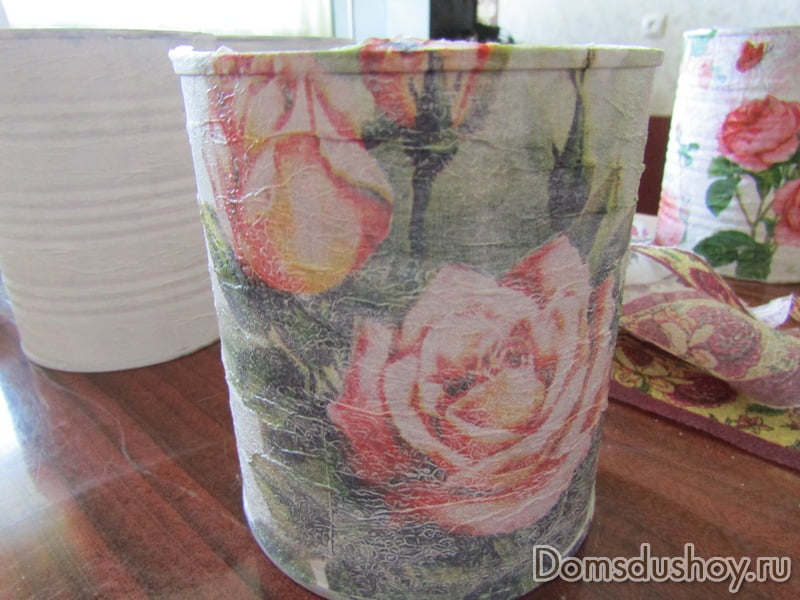
Here is the first jar and ready. It turned out for me with frank flaws. But I already said that this is my first work on decoupage of metal cans. I was not upset, because there are still five cans ahead and I hope for “rehabilitation”. And the fact that the jar turned out with a white coating is PVA glue, when it dries, the coating will pass a little.

- Started work with the second jar. Here I already cut the napkin to size with scissors and began to carefully stick it on.
Here is the second jar.

- I did everything in the same way on all jars. This is a photo of raw cans. Here is the third one. Of course, wrinkles are inevitable. They straighten out a little when the jar dries out. Yes, and these wrinkles are visible only up close.
- The fourth jar was quickly sealed and now it is already drying.

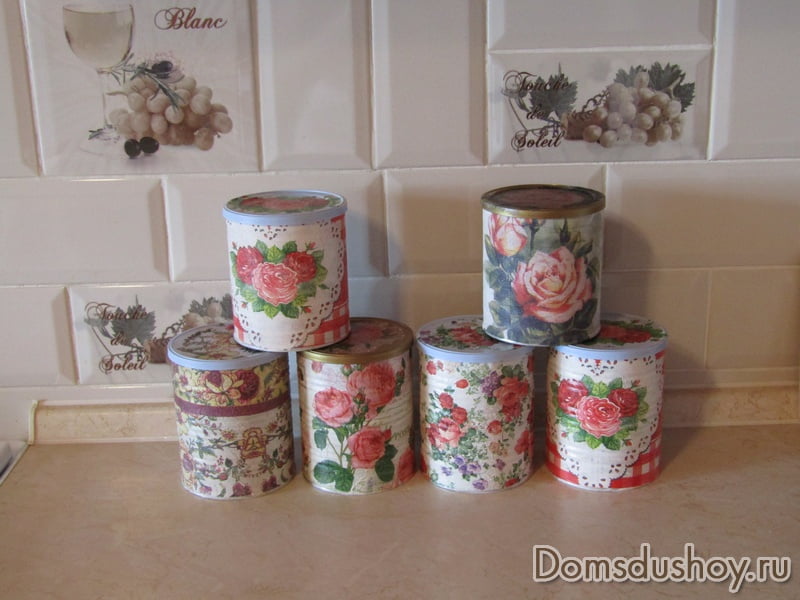
- I made the fifth and sixth cans the same, since there was no sixth type of napkins.

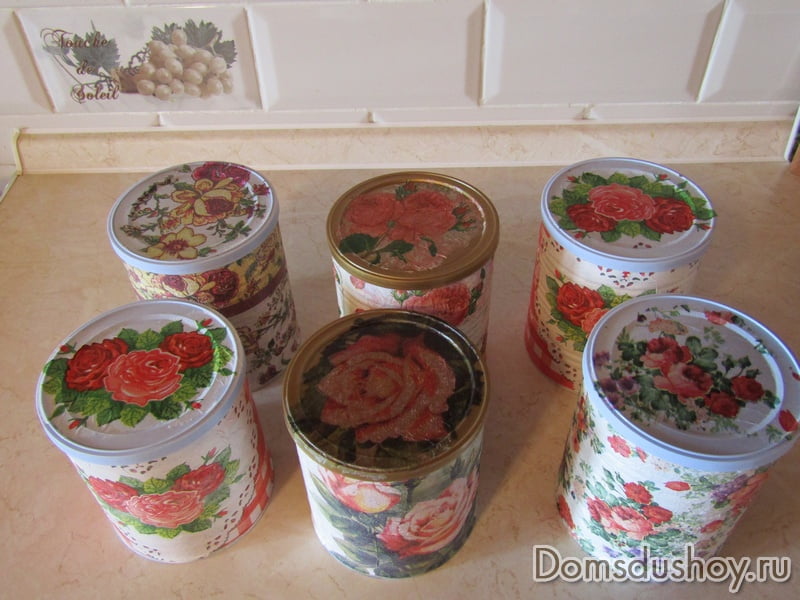
- While the banks dry took care of the lids.
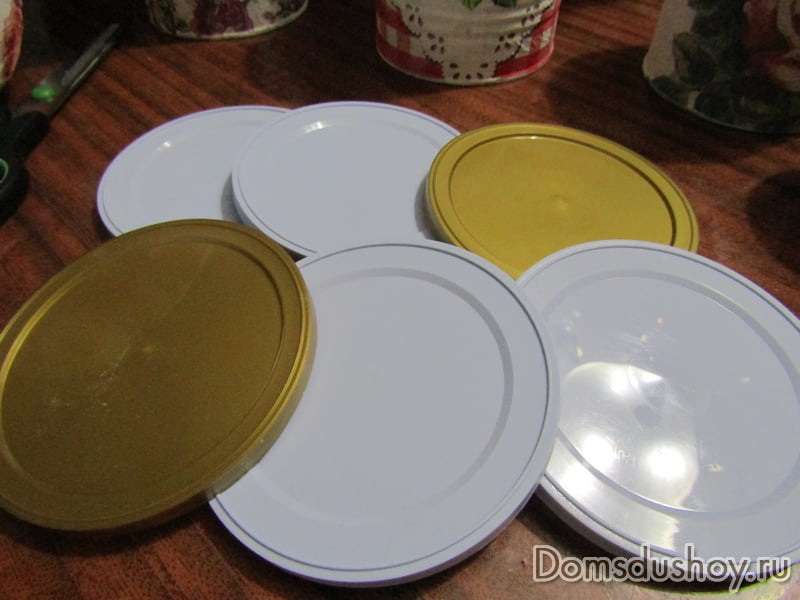
- To make the edge uneven tore fragments out of napkins and in the same technique I pasted them on the surface of the lids.
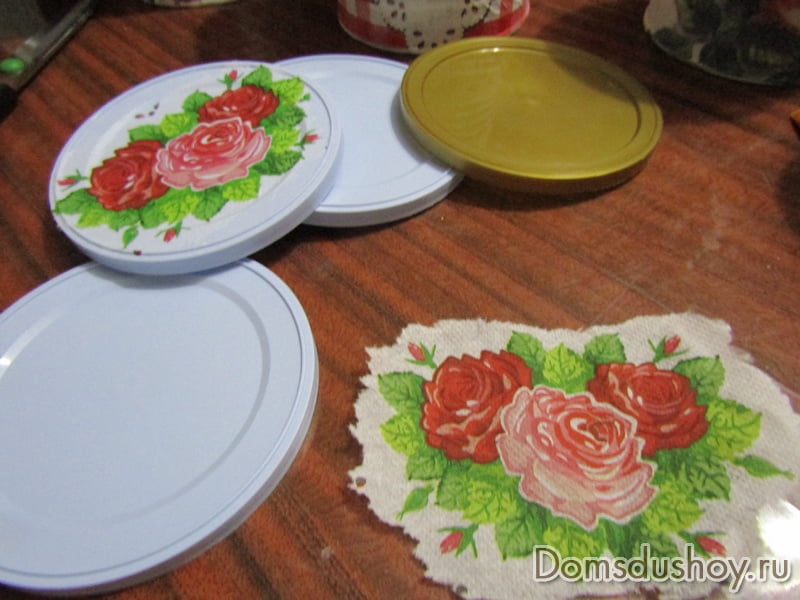
- And for each jar there was a lid with the same pattern.

I did all this in one evening, sitting in front of the TV. I left the jars and lids to dry until morning.

And in the morning I took acrylic varnish and covered all surfaces.
And here are the jars.

Some people may not like flowers. So after all, you can even use newspapers for decoupage! If you want, try and you are sure to get something.
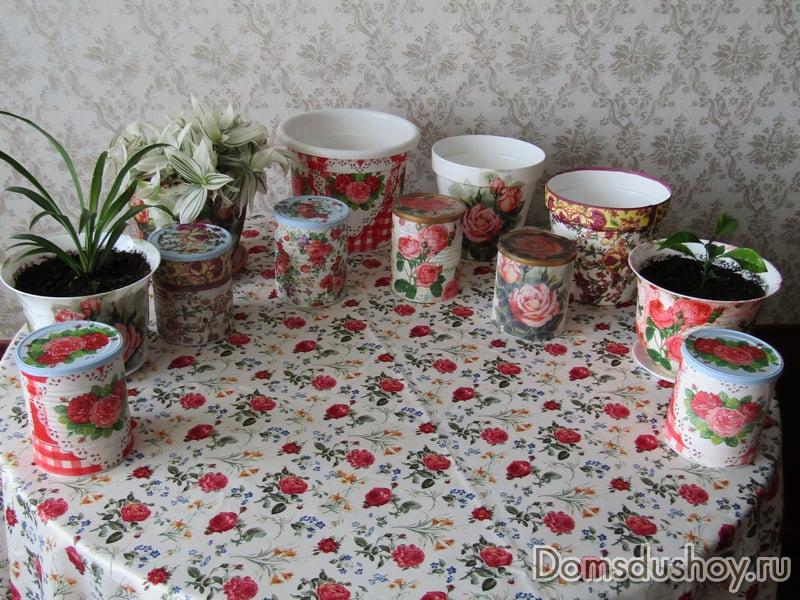
Using the decoupage technique, you can decorate not only metal cans, but also glass ones. And much more. For example,
Here are the pots I got. I was engaged in the same evening and the next morning, when I designed these jars.
The great thing is that it is easy to pick up such napkins that you will like.

And it takes very little time to work. But there is required condition: a wish do something for the home with your own hands and at the same time with a good mood. I wish you all good luck!

More options for using baby food jars:
2016, . All rights reserved.
Are you a new mom? Then, probably, glass baby food jars appeared in your life, which the hand does not raise to throw away. There are already a lot of them in my house, so I propose to discuss how they can be useful to us.
I conducted a small survey of colleagues and girlfriends on this topic. The results are as follows:
Lena keeps his branded adjika in jars - it is convenient to take it in such a container for a picnic, for example.
Puts dried berries in them for tea.

She also arranges small tasty gifts for her friends - her own homemade jam. Arranges in jars, decorates them and gives them.

The last idea hooked me - I love making homemade jam. I took note of such a sincere gift option.
Zhenya stores medicinal ointments in jars. Also a great option, given the odor of such drugs, as well as their small volumes.

Anya uses jars as a sugar bowl and salt shaker on a long-distance journey. Or for a picnic. She also keeps beads for needlework in them.

I tried to use jars for the remains of canned cod liver. And this, I tell you, is extremely convenient. Open canned food should not be stored for longer than a day, and it is imperative to transfer food to a container, preferably glass. And the baby food jars are perfect! Small, hermetically sealed (which is especially important in the case of products with the smell of fish), and then it is not a pity to throw them away.
And she put paperclips in one jar. There was an open package at home, now the paper clips are neatly stored in a jar.

Inspired by the opening horizons for the second life of jars, I began to look for other ways to use them. I searched websites and social networks. I confess, I am delighted with the fantasy of young mothers, and dads too!
How to use baby food jars
Use jar lids in children's educational games:
Stick pieces of colored paper on them and arrange them in containers by color,
Stick drawings with letters on them and add syllables and words,

Make a slot in the lid of a can of milk formula (or in a box of chips, for example) and put the lids into it, like in a piggy bank,
Make a fishing rod out of a pencil, string and magnet and arrange a "fishing" by collecting caps.
Use banks:
For dipping the brush while painting with watercolors,
For seedlings of flowers or greenery,

As small vases for small wild flowers,

To store spices

As a home air freshener: put a piece of cotton wool in a jar and moisten the cotton wool with a drop of perfume or essential oil. If you decorate a jar - it’s not a shame to put such a replacement for a sachet and put it in a prominent place in the house,

Needlewomen - store small items such as buttons, beads, etc. in jars,

Use as portioned dishes in candy bars that are so popular now at children's parties,

Colorize and turn the jar into a candlestick by putting a pill candle into it,

I have found pills. It's a sin not to try, I decided. I’m not friends with paints yet, I found a satin ribbon. Half a minute to tie it, and voila! Modest, but also an option.

But finally I was subdued by such a decor of the jar.

Using a jar as a photo frame is original, right?
And also, I think, it may even be interesting not to search for the use of cans or lids, but to decoration process. Space for imagination, yours and your child!
How to decorate jars
Cover with spray paint, or decorate with acrylic or stained glass paint,

Paste over the jar with double-sided tape and roll in sequins or beads,

Use the decoupage technique (stick a beautiful napkin with a pattern on the jar), since there is an abundance of materials for needlework on sale now,

Stick lace, ribbons, fabric on the jar,

Sticking clippings from magazines or newspapers looks very interesting.

Wrap the jar with threads or decorative straws.

And then, together with the child, come up with what you can put in a beautiful jar.
There is only one "but" in the active use of cans for different needs. Given the presence of a baby in the house, do not forget to check their inaccessibility for his ubiquitous little hands. Glass is beautiful, reliable and environmentally friendly, but dangerous. So, subject to safety conditions, - cheers for jars!
I started to feed my baby and was faced with the fact that there are a lot of jars. but it’s a pity to throw them away and I came across such an article, I’m sure it will come in handy
It just so happened that a Russian person always has something that he does not need, but it is a pity to throw it away. Old skis on the balcony, a long-broken freezer in the same place, a samovar lying around under the bed. But if you can still take a freezer and a samovar to the country, and go skiing in the winter from a hill in the yard, then what to do with the ever-accumulating number of cans that take up space? We offer you several ways to give ordinary glass jars a second life. Of course, provided that they do not go to the closing of cucumbers, tomatoes and other goodies.
1. Cans can be used to make oil lamps. Fill two-thirds of the jar with kerosene and close the lid. Put a rope in a jar of kerosene and let it soak for about an hour. Make a hole in the lid and pass the rope through it.

2. Container for matches. And the top of the lid can be replaced with a match grater.

3. Cans can also be used to make garlands.

4. Another option.

5. Container for sewing supplies.

6. A set of containers for bathroom accessories. The jars are held on to a piece of wood with picture hangers and pipe clamps.

7. And here is a great way to start seedlings.

8. Children constantly throw small things around? They can be hidden in jars, and plastic animal figures can be glued to the lid.

9. A great way to store yarn. And if you make a small hole in the lid, it will be convenient to get it.

10. For lovers of needlework, a bank is a great way to organize a rich selection of ribbons.
11. Pizza in a can. You can add any ingredients you like to the jar and save until baked. And you can bake pizza in a jar in a deep pan filled with water.

12. Shelf for spices made of glass jars with magnets. This is just an amazing idea if you have anything stainless steel in your kitchen. Pour spices into jars, stick labels on them and glue magnets to the lids.

13. By analogy with spices, buttons can be stored in jars. To store them as shown in the picture, you need to nail the lids to the shelf, fill the jars with the necessary contents and twist them.
14. Vases from cans. Pour the acrylic paint of your favorite color (about 5 cm) into the bottom of a clean, dry can, and then turn the can upside down and slowly turn it so that the paint spreads evenly over the entire inside of the can. True, pouring water into such vases is impossible.
15. You can also spray paint the jars. It is only advisable to work outside or in a well-ventilated area.

16. You can make such candlesticks from cans.

17. If you do not have a chain, you can hang the jar on a rope. Get a more rural atmosphere.

18. In principle, using a jar as a candlestick is elementary simple. Just sprinkle sand or pebbles on the bottom of the jar to keep the candle.

19. Or you can fill the jars with water and put pill candles on them.

20. Cupcakes in a jar. And as an addition to such an unusual gift, give a spoon with a beautiful ribbon.

21. Make a terrarium out of a jar.

22. Well, using jars as salad containers for a picnic or kebabs is a thing of the past.
23. You can make such beautiful interior details with messages written with glue from a glue gun.

24. You can also use letters for scrapbooking.

25. Banks can even be used as photo frames.

26. Fireflies in jars. Cut open a glowing neon stick and pour its contents into a jar. Add glitter. Close the lid and shake.

27. Make a container for liquid soap from a can.

28. A jar can replace the blender body. In addition, most blades fit perfectly on the lid of the jar.

29. Dessert s'more in a jar.

30. Make a chandelier out of cans.

31. You can serve cutlery in jars.
32. Mini pies in jars.
33. You can drink from a can. Replace the lid with a softer material, then make a small hole in it and insert a straw. The lid can be decorated in a summer way.

34. It's time to update the bra.

35. On the lid of the jar, you can make such a “spout” to make it easier to pour or pour out its contents.

36. You can buy just such a lid and take a jar with you on the road.
42. And in mini-jars, you can serve oysters in ice.

43. From a jar of unusual shape, you can make a ball with sparkles. As a souvenir for the New Year.

44. You can make a sort of air freshener. Just punch holes in the lid and fill the jar with something nice smelling.

45. You can store oatmeal in jars. Mix together rolled oats, Greek yogurt, milk, chia seeds, and a sweetener such as fruit. Shake the contents of the jar and refrigerate. Can be stored up to 2 days.

46. Make an ice cream gift set. Sugar, vanilla powder and paktiki with cream inside plastic jar by adding some rock salt. When the time and mood comes and you want to make ice cream, just mix all the ingredients and add ice to salt. And then shake the jar hard.
In every family with small children, there are at least a few jars left after eating baby food. Don't rush to throw them away. With a little imagination, you can make a lot of interesting things out of this compact container.
Jars must be thoroughly washed and dried before use. After that, you can decorate them as you wish, using various materials.

Here is a selection of creative ideas for reusing baby food jars that you can use to make unique, original and useful household items.
Convenient jars for spices.
Agree that storing spices in store packaging is not the best solution. Making a convenient container for spices from jars is not difficult. Just peel off the labels and instead stick labels with the designation of the contents. You can go even simpler and sign the lids. Those who love creative solutions can decorate the jars to their taste with the help of ribbons, painting or decoupage.


Gift box for sweets.
Decorate the jars to your taste (for example, with coarse ropes and colored fabric) and get a wonderful gift box. Pour colored dragees or small sweets into the container - an unusual surprise for the sweet tooth is ready.
.jpg)


You can also use jars for jam, honey or marmalade. A great way to beautifully present homemade sweets to friends and family. Attach small paper cards to the jars, on which you can write information about the contents or a sincere wish. Decorate mugs with beautiful napkins and ribbons.


Pencils.
Paint the jars in different colors and, when the paint dries well, place pencils and felt-tip pens in them.
You can use jars for other office supplies.
.jpg)


Needle beds.
Pour colored buttons into the jars, and glue home-made pads made of foam rubber covered with colored fabric on the lids. The original is sure to come in handy for those who are fond of needlework.


.jpg)
New Year decoration.
To make an analogue of a snow globe, you need to fill the jar with small sparkles, beads, artificial snow or mashed foam and pour water. Add 1 tablespoon of glycerin to make our "snowflakes" swirl with movement. You can take more glycerin, then the particles will float in the water more slowly. As a decor, use any New Year's toy - it must be glued to the lid.
.jpg)


Vases for flowers.
Wonderful vases for small short bouquets are obtained by simply placing the flowers in jars. You can dream up a little and add decor compositions.
.jpg)


Candlesticks.
handsomely decorated jars can become wonderful candlesticks that will decorate any holiday. At the bottom of the jar you need to pour sand, and place a small tea candle on top. The design depends on your imagination and skills: it can be as simple as possible or more inventive.


.jpg)
Container for small things.
Hairpins, buttons, sewing accessories, carnations and other household items are very convenient to store in baby food jars. Jars can be glued with lids to the shelf - then they will definitely not be lost and will always be in sight.
.jpg)

Or use this handy cosmetic container.

Seedling pots.
Seeds can be grown in jars. If the plants do not require special conditions and are small in size, then with the help of small jars you can build a kind of botanical garden in a mini version. Pour the earth into jars, plant seedlings and do not forget to water regularly.

In every family with small children, there are at least a few jars left after eating baby food. Don't rush to throw them away. With a little imagination, you can make a lot of interesting things out of this compact container.
Jars must be thoroughly washed and dried before use. After that, you can decorate them as you wish, using various materials.
Here is a selection of creative ideas for reusing baby food jars that you can use to make unique, original and useful household items.
Convenient jars for spices.
Agree that storing spices in store packaging is not the best solution. Making a convenient container for spices from jars is not difficult. Just peel off the labels and instead stick labels with the designation of the contents. You can go even simpler and sign the lids. Those who love creative solutions can decorate the jars to their taste with the help of ribbons, painting or decoupage.
Gift box for sweets.
Decorate the jars to your taste (for example, with coarse ropes and colored fabric) and get a wonderful gift box. Pour colored dragees or small sweets into the container - an unusual surprise for the sweet tooth is ready.
You can also use jars for jam, honey or marmalade. A great way to beautifully present homemade sweets to friends and family. Attach small paper cards to the jars, on which you can write information about the contents or a sincere wish. Decorate mugs with beautiful napkins and ribbons.
Pencils.
Paint the jars in different colors and, when the paint dries well, place pencils and felt-tip pens in them.
You can use jars for other office supplies.
Needle beds.
Pour colored buttons into the jars, and glue home-made pads made of foam rubber covered with colored fabric on the lids. The original is sure to come in handy for those who are fond of needlework.
New Year decoration.
To make an analogue of a snow globe, you need to fill the jar with small sparkles, beads, artificial snow or mashed foam and pour water. Add 1 tablespoon of glycerin to make our "snowflakes" swirl with movement. You can take more glycerin, then the particles will float in the water more slowly. As a decor, use any New Year's toy - it must be glued to the lid.
Vases for flowers.
Wonderful vases for small short bouquets are obtained by simply placing the flowers in jars. You can dream up a little and add decor compositions.
Candlesticks.
Beautifully decorated jars can become wonderful candlesticks that will decorate any holiday. At the bottom of the jar you need to pour sand, and place a small tea candle on top. The design depends on your imagination and skills: it can be as simple as possible or more inventive.
Container for small things.
Hairpins, buttons, sewing accessories, carnations and other household items are very convenient to store in baby food jars. Jars can be glued with lids to the shelf - then they will definitely not be lost and will always be in sight.
Or use this handy cosmetic container.
Seedling pots.
Seeds can be grown in jars. If the plants do not require special conditions and are small in size, then with the help of small jars you can build a kind of botanical garden in a mini version. Pour the earth into jars, plant seedlings and do not forget to water regularly.